 .
.
The PaymentVision Module will allow the firm to communicate with PaymentVision to take real-time payments, set up recurring payment or send account information for an online payment portal.
Note: The PaymentVision Interface Module is an optional module. If interested, please contact Sales for information about obtaining this module.
The interface will provide the following features:
The ability to submit credit card information to PaymentVision for tokenization. For compliance reasons, your firm will not retain any personal credit card information yet will still be able to submit future credit card payments to their service.
The ability to post one time payments (credit card and ACH) in CollectMax. These payment records will automatically be submitted to PaymentVision for processing.
The ability to enter recurring/scheduled payments (credit card and ACH) in CollectMax and process all payments scheduled for the day to PaymentVision and auto-post the payments in CollectMax.
The ability to retrieve batch id files from Payment Vision in CollectMax for payment reconciliation. The interface provides reporting on all transactions.
The ability to send account data through the Customer Information File to assist Payment Vision with providing an online payment portal for your customers.
Note: All deletes and reversals are manually
adjusted
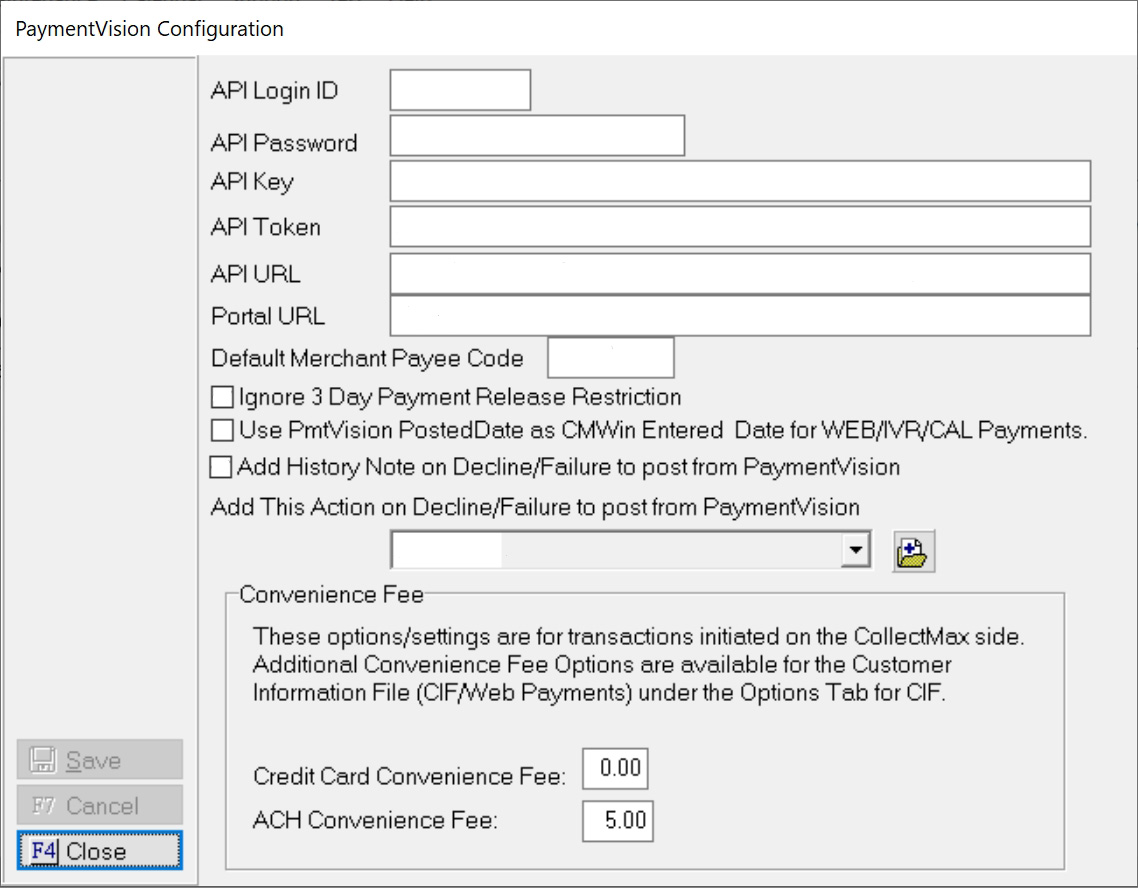
Before the Interface Module will work or be completely installed, the firm will need to get with PaymentVision to obtain your API Key, Login ID, Password, Merchant Payee Codeand API Token. Once the module has been installed and before you start processing credit card and ACH transactions you must define all trust accounts . It is important that you have this information prior to implementation of PaymentVision payment processing. Once this information has been provided to you, please contact JST Technical support for installation of your new feature or if already installed, enter the information on the .
After JST installs PaymentVision, a few configurations are required prior to taking your first ACH and credit card payment. PaymentVision will allow you to use multiple trust accounts. However, it will require that you add the information to each trust account prior to processing your first ACH transaction.
This can be done by going to the Main Menu, Definitions, Codes, Bank Accounts, then find the Bank Account you plan on using.
Select .
Click on the  button.
The PaymentVision configuration box will pull up. Please use the radio buttons to select the proper Merchant Payee Code. If you select "Use Bank code as Merchant Payee Code" it will use the CollectMax bank code for the trust account. If you select "Use this code as Merchant Payee Code" it will use the PaymentVision Merchant Payee Code provided.
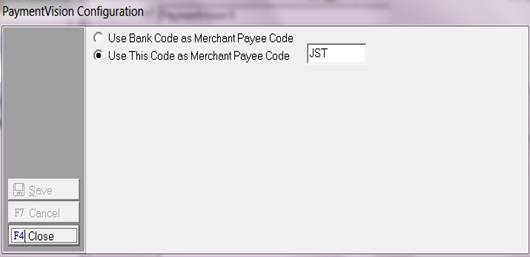
Then select  .
.
Things to Remember: For users who have only one trust account set up in CollectMax but have multiple trust accounts at their actual bank. Please contact sales
The next configuration is set up at the Main Menu, Accounting Tab, PaymentVision Tab, Configuration.
In special instances, you may have several Merchant Payee Codes for different clients. In those instances, please set up the next configuration. This is set up from the Main Menu, Client Accounts, select the Client Accounts, select Settings, and select Trust Bank.
Enter your Merchant Payee Code provided by PaymentVision in the PaymentVision field. Please double check your value before saving because this is how everything will be categorized on PaymentVision’s website.
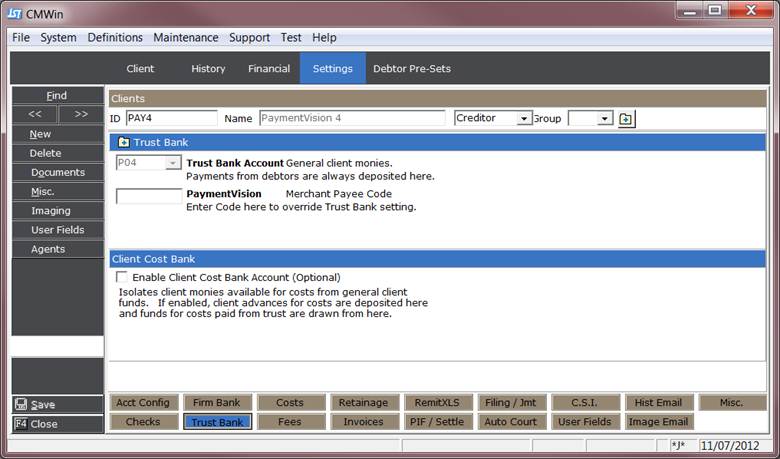
Then select .
JST Hint:Please keep
in mind if a value is entered for Merchant Payee Code in the Client section it
will override the setting saved at the bank level.
In order to start using the web payment feature available with PaymentVision they will need a file of your data. We have provided a seamless way of obtaining the file format required to get the process started. This file can be ran as many times as needed. It takes the guess work out of what is required and the format needed.
1. This can be done by
going to the Main Menu, Accounting,
PaymentVision, ![]() .
.
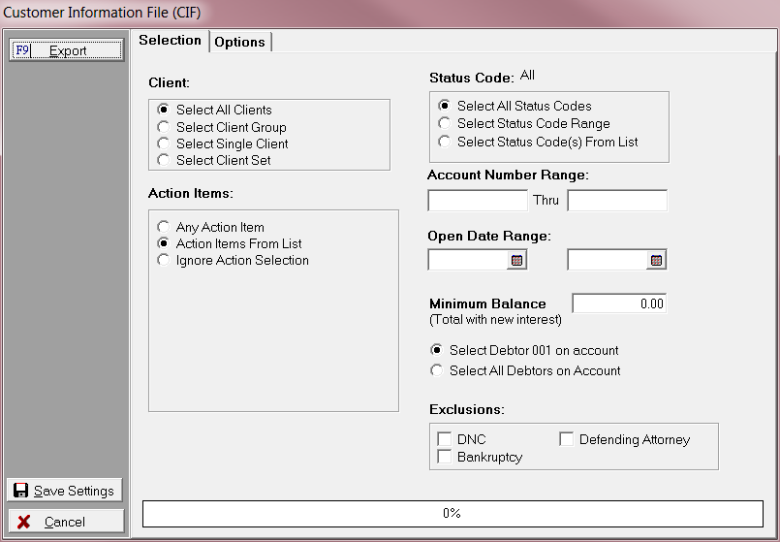
2. Make sure you are aligned to the Options Tab.
3. The following screen will appear.
4.
Select your output directory by clicking on ![]() . This will allow you to navigate to the path
you want for your output of your CIF file.
. This will allow you to navigate to the path
you want for your output of your CIF file.
![]()
5. Select your
backup directory by clicking on ![]() . This will allow you to navigate to the path
you want for your backup file of your CIF file.
. This will allow you to navigate to the path
you want for your backup file of your CIF file.
![]()
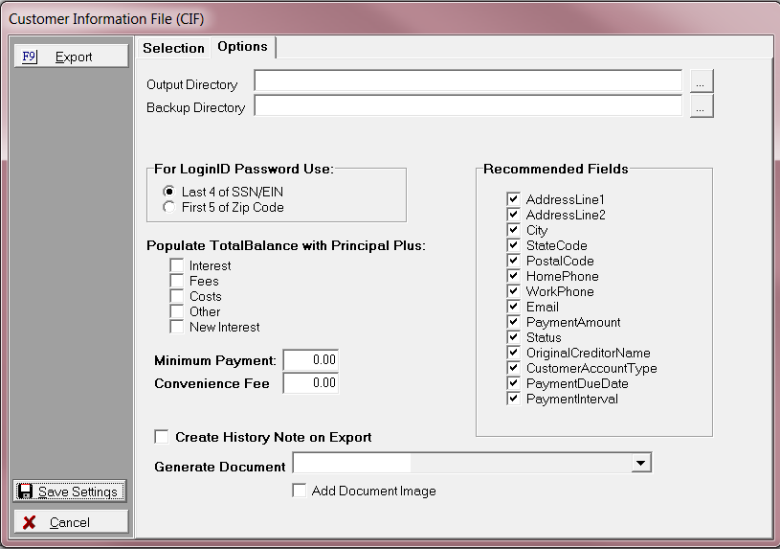
6. Select how you want PaymentVision to set up your users login and passwords . In this selection you can select to use the last 4 of their SSN or the first 5 of their zip code.
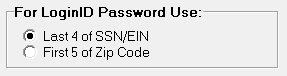
7. Select the categories that you want to upload to the web. By default the principal amount will go up automatically. If you want to include other items check the appropriate boxes.
8. If you want to set the minimum payment that the website will take include that amount here. Enter the dollar amount.
![]()
9.The convenience fee is used for the amount that you will charge the user for participating with the web payment feature. Enter the dollar amount.
![]()
JST HINT: PaymentVision website does not process the convenience fee at this time. When they
do this is available for you.
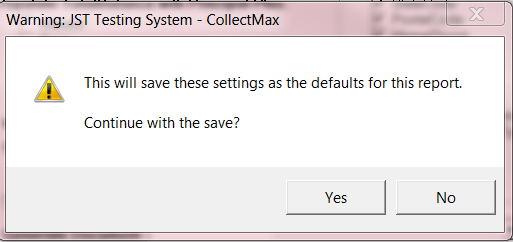
10. To help keep track of the accounts that you send up to PaymentVision website we have an option called “Create History Note on Export”. This feature will create a history note on all the accounts that you export using the CIF file . It will include the date, timestamp,operator, and total balance at the time of export. This amount will represent the boxes checked on the options screen.

11. We also have an option where you can generate and add a document to an image during the time of your CIF file creation. Once the file is processed if you selected this option you will find your documents in the appropriate print list ready to print. After the image prints will save the document as an image on the debtors account.

12. The select the ![]() button.
button.
13. Then a pop-up.
14. Then select ![]() .
.
15. Then this pop up should show up.
 .
.
JST HINTS: The recommended fields are
already set up for the default required fields for PaymentVision. If you want to deselect any of them or add
any of them select the check box to the left of the item.
We now allow you to create an export file to send to PaymentVision which will allow you to acceptweb payments. This file has all the requirements needed from PaymentVision and it is in the proper format.
1. This can be done by
going to the Main Menu, Accounting,
PaymentVision, ![]() .
.
2. Make sure you are aligned to the SelectionTab.
3. The following screen will appear.
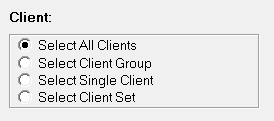
4. Select a Client.
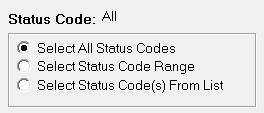
5. Select a Status Code.
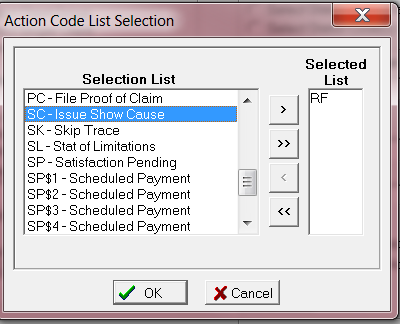
6. Select your Action Items.
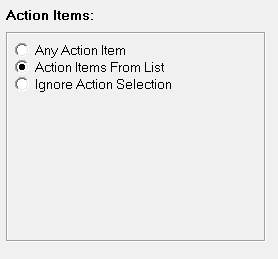
7. If you select “Action Items from List”.
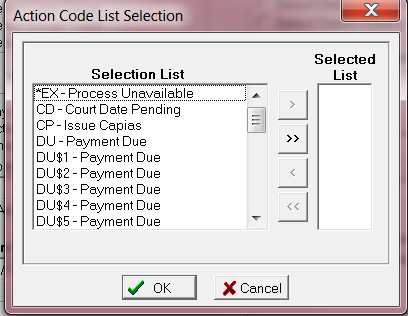
8. Then use the appropriate arrows to move the actions to your selected list.
9. Then click ![]() .
.
10. If you want to have your actions completed check the box and use the drop down to select the completion code.
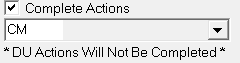
JST
HINT: If you select DU or SP$ Action codes they will not complete.
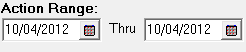
11. Enter you Action Range Date.
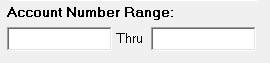
12. If you need additional filters you can filter by Account Number Range.
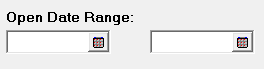
13. If you want to filter by Open Date Range make sure you complete this section.
14. If you want to filter by Minimum Balance. This amount will include New Interest.
![]()
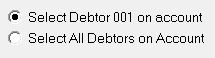
15. This file can be created with Debtor 001 or ALL debtors on the account. Make your selection by clicking on the appropriate radio button.
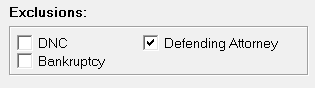
16. You can opt to exclude the following “Do Not Contact”, “Bankruptcy”, “Defending Attorney”.
17. Then select ![]() .
.
18. The Export file will be in your output directory that you selected under options.
19. If you checked the box for “Create History Note on Export” . If you pull up the debtor’s history you should see the below note dated 09/29/2012.

20. To return to
the PaymentVision main window click on the ![]() .
.
21. The output file can now be forwarded to Payment Vision. This does not happen automatically you will have to retrieve the file and then send it by the appropriate means to PaymentVision.
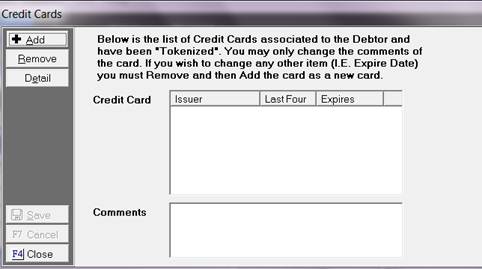
Tokenization is the ability to take credit card payment and substituting the information with a tokenized value that will allow you to submit future credit card payments.
To enter a credit card into CollectMax and submit for tokenization.
1. This can be done by
going to the Main Menu,  , then find the debtor’s account you would like
to tokenize the credit card for.
, then find the debtor’s account you would like
to tokenize the credit card for.
2. Then align yourself
to the ![]() tab.
tab.
3. Then click on ![]() button.
button.
4. Then select the credit card option.
5. Then select ![]() .
.
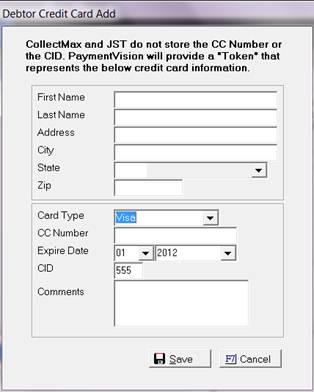
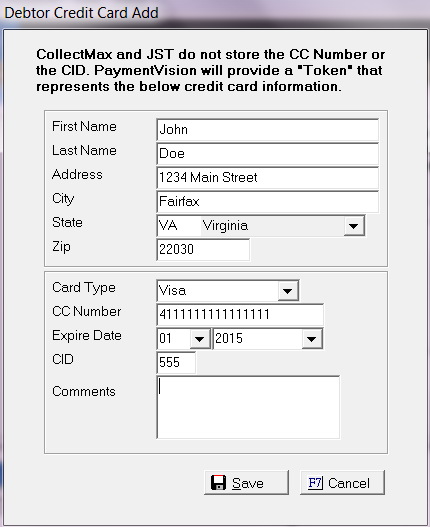
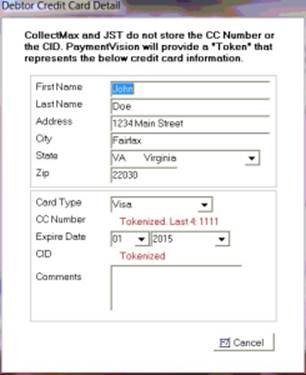
6. The credit card debtor add form will auto-populate with the demographic information on the debtors account. It can also be changed during the time of entry.
7. All fields need to be filled out completely. (First Name, Last Name, Address, City, State, Zip)
JST HINT: Make sure
this is the billing information for the debtor’s credit card. If for some
reason it is not the same mailing address this will need to be done prior to
tokenization.
8. The next section is for the card type and credit card number, expiration date and CID. All of these are mandatory fields that most be filled in.
9. The comments section is optional this can be used for any special notes and or instructions, in reference to the credit card.
10. The select .
11. The select .
12. Then you should have the below pop up message.
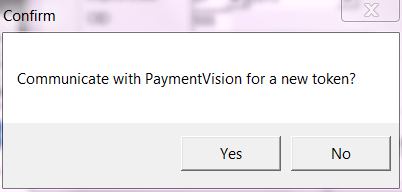
13. Then select ![]() .
.
14. Once the token is created the message below will be given.
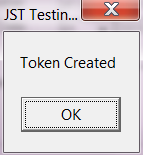
15. If you click on details you will see the tokenized credit card information.
The PaymentVision module allows for ACH and credit card payments to be processed as a one time only transaction. These transactions can be added at the time of entering a payment on the financial screen.
The ACH immediate payment is entered at the debtor account level.
1. This can be done by
going to the Main Menu, Debtor Accounts, Select the Debtor, Select the ![]() Tab.
Tab.
2. Enter a “PMT” transaction code in the transaction code field. Then click OK.
3. The payment method used to enter a ACH payment is “N- Electronic Funds Transfer”.
4. The payment release date for “ACH” transactions for PaymentVision is a minimum of (3) three business days.
5. Then you should see the PaymentVision ACH option Box:

6.Select the radio button for post new ACH payment to PaymentVision.
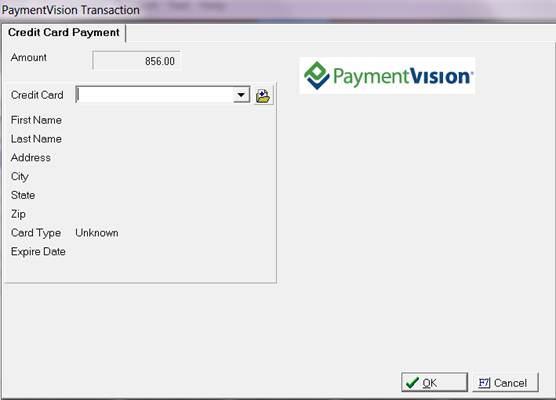
7. This will pull up the PaymentVision transaction screen:

8. The top field shows the payment amount. It is imperative that you verify the amount before posting the payment.
9. The debtor’s demographic information will be auto-populated from the debtor screen. If you have a name of a different individual that may be making this one time payment. You can update the necessary fields.
10. In the next section enter your banking information. This information will be pulled in if you have bank account information already entered into CollectMax. However, if you wanted to use another bank account and you do not want to add it to the system, you can update the information here.
11. The contact via are different descriptions on how the payment was processed. The default setting is TEL- which stands for Telephone-Initiated Entry. The other types are CCD-which stands for concentration or disbursement, PPD-which stands for pre-arranged payment or deposit, and WEB-which stands for initiated entry.
12. The select Ok.
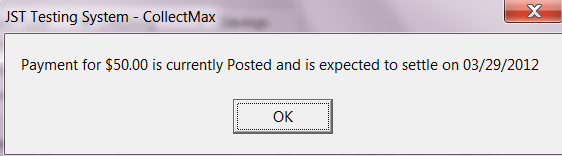
13. The transaction will then be sent to PaymentVision. If your transaction is posted you should receive this message.
JST Hints: Make sure you double check all ABA numbers and account numbers for processing.This manual verification will minimize processing errors.
Holiday Scheduling:
If you are using the holiday scheduling on your system the three day processing period may be longer if you have a date not available for the system.
The credit card immediate payment is entered at the Debtor Account Level.
1. This can be done by
going to the Main Menu, Debtor Accounts, Select the Debtor, Select the ![]() Tab.
Tab.
2. Enter a “PMT” transaction code in the transaction code field. Then click OK.
3. The payment method used to enter a credit card payment is “M- Credit Card Payment”.
4. The payment release date for “Credit Card” transactions for PaymentVision is a minimum of (3) three business days.
5. Then you should see the PaymentVision credit card option box:
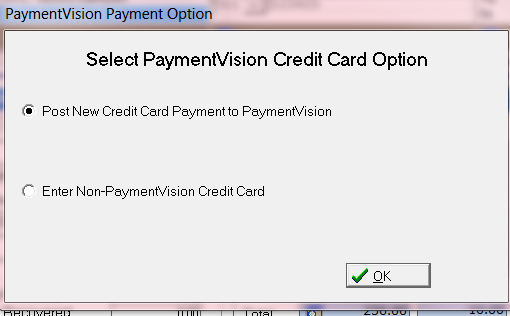
6. Select the radio button for post new credit card payment to PaymentVision.
7. This will pull up the PaymentVision transaction screen:
8. The top field shows the payment amount. It is imperative that you verify the amount before posting the payment.
9. The debtor’s demographic information will be auto-populated from the debtor screen. If you have a name of a different individual that may be making this one time payment. You can update the necessary fields.
10. In the next section enter your banking information. This information will be pulled in if you have bank account information already entered into CollectMax. However, if you wanted to use another bank account and you do not want to add it to the system, you can update the information here.
11. The contact “Via” are different descriptions on how the payment was processed. The default setting is TEL- which stands for Telephone-Initiated Entry. The other types are CCD-which stands for concentration or disbursement, PPD-which stands for pre-arranged payment or deposit, and WEB-which stands for initiated Entry.
12. The select Ok.
13. The transaction will then be sent to PaymentVision. If your transaction is posted you should receive this message.
JST Hints: Make sure you double check all ABA numbers and account numbers for processing. This manual verification will minimize processing errors.
Holiday Scheduling:
If you are using the holiday scheduling on your system the three day processing period may be longer if you have a date not available for the system.
Allows you to set a number of payments in the future , on a designated date. The scheduled payment can be either a credit card payment or ACH transaction.
The ACH scheduled payments are entered at the Debtor Account Level.
1. This can be done by
going to the Main Menu, Debtor Accounts, Select the Debtor, Select the ![]() Tab.
Tab.
2. Go to the payment plan
section and click on the ![]() button.
button.
3. Select “Payment Vision”.
4. The scheduled payment screen should pull up.
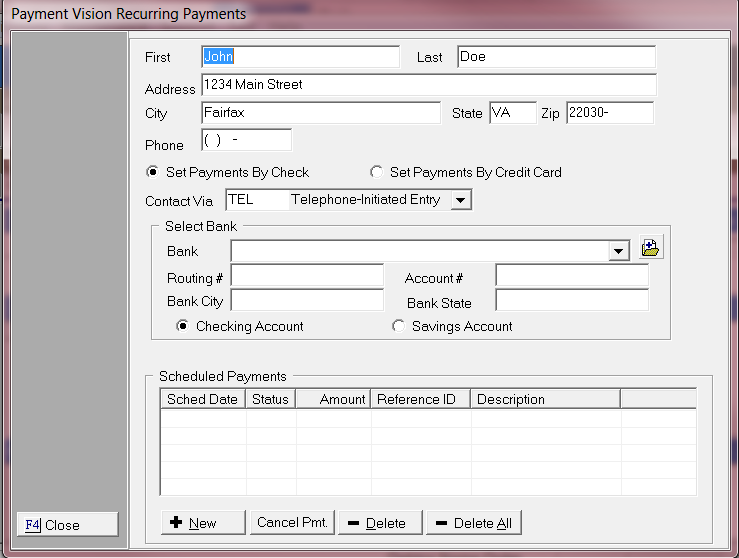
5. The debtor’s demographic should populate the form with the existing data captured on the debtor screen. If any information should be changed fill the form out before proceeding.

6. Then select the radio button “Set Payments By Check”.
![]()
7. Select how you were contacted using the drop down selection.
![]()
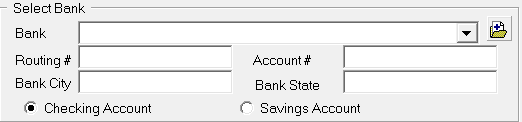
8. In the select bank
section you can use the drop down for any available bank account information.
If you want to retain the information the debtor’s account you will have to
use the ![]() button to add new bank account information. If
you only attend to use the bank information for this scheduled payment, type your banking information using the free
text mode.
button to add new bank account information. If
you only attend to use the bank information for this scheduled payment, type your banking information using the free
text mode.
9. Then
select ![]() .
.
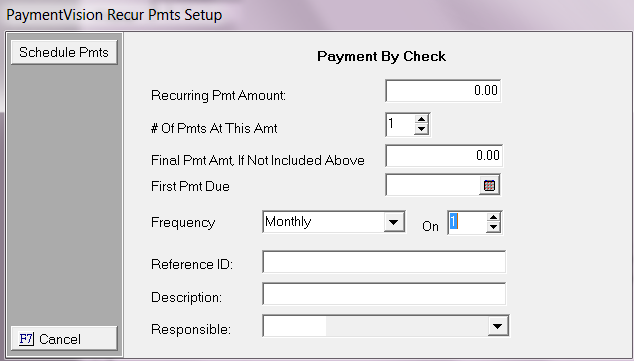
10. Enter your recurring payment amount.
![]()
11. Enter the number of payments for this amount.
![]()
12. Final pmt amt, If not Included above. This is optional.
![]()
13. Enter your First Payment Due Date.
![]()
14. Enter the Frequency of your recurring payment.
![]()
15. Enter the number of your recurring payments.
![]()
16. Enter your reference id. This is optional.
![]()
17. Enter your description. This is optional.
![]()
18. Enter a responsible. This is optional.
![]()
19. Then click ![]() . To
save your selection.
. To
save your selection.
JST Hint:If you have the ![]() . When you click the
box it will change to
. When you click the
box it will change to ![]() It will no longer allow you to Cancel Payments or Delete
them.
It will no longer allow you to Cancel Payments or Delete
them.
To allow modification to a plan:
When you unclick the box stating Plan Approved. It will now allow you to Cancel Payments or Delete or Delete them.
20. Then select ![]() .
.
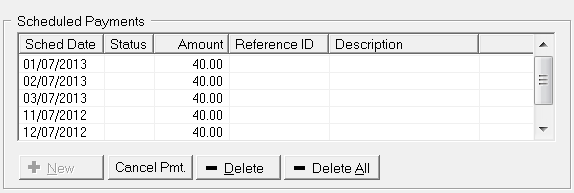
All scheduled payments can be viewed at the action screen, however no modifications can be done at this screen. It must be done at the scheduled payments screen. The scheduled payments are represented by a SP$ and is proceeded by a number which represents the debtor on the account. A “1” would represent debtor 1.

All scheduled payments will be held until the requested date of the payment.
The Credit Card scheduled Payments are entered at the Debtor Account Level.
1. This can be done by
going to the Main Menu, Debtor Accounts, Select the Debtor, Select the ![]() Tab.
Tab.
2. Go to the Payment
Plan Section and click on the ![]() button.
button.
3. Select “Payment Vision”.
4. The scheduled payment screen should pull up.
5. The debtor’s demographic should populate the form with the existing data captured on the debtor screen. If any information should be changed fill the form out before proceeding.
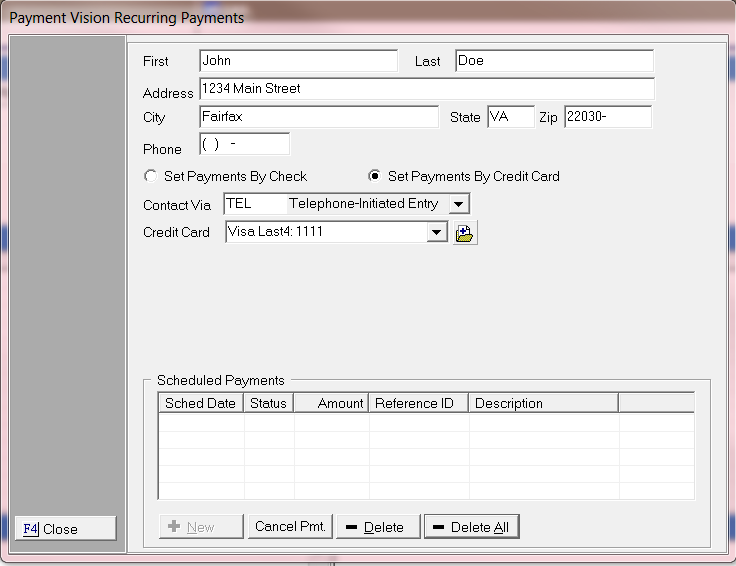
6. Then select the radio button “Set Payments By Credit Card”.
![]()
7. Select how you were contacted using the drop down selection.
![]()
8. In the select Credit Card section you can use the drop down
for any available Credit Cards account information. If you do not have available credit cards to use select the ![]() button to add new credit card information. It
will require you to also tokenize the credit card before use.
button to add new credit card information. It
will require you to also tokenize the credit card before use.
![]()
9. Then select ![]() .
.
10. Enter your recurring payment amount.
![]()
11. Enter the number of payments for this amount.
![]()
12. Final Pmt Amt, If not Included above. This is optional.
![]()
13. Enter your First Payment Due Date.
![]()
14. Enter the Frequency of your recurring payment.
![]()
15. Enter the number of your recurring payments.
![]()
16. Enter your reference id. This is optional.
![]()
17. Enter your description. This is optional.
![]()
18. Enter a responsible. This is optional.
![]()
19. Then click ![]() . To
save your selection.
. To
save your selection.
20. Then select ![]() .
.
All scheduled payments can be viewed at the action screen, however no modifications can be done at this screen. It must be done at the scheduled payments screen. The scheduled payments are represented by a SP$ and is proceeded by a number which represents the debtor on the account. A “1” would represent debtor 1.
All scheduled payments will be held until the requested date of the payment.
JST Hint:If you have the ![]() .When you click the
box it will change to
.When you click the
box it will change to ![]() It will no longer allow you to Cancel Payments or Delete
them.
It will no longer allow you to Cancel Payments or Delete
them.
To allow modification to a plan:
When you unclick the box stating Plan Approved. It will now allow you to Cancel Payments or Delete or Delete them.
After all your Payment Transactions are processed from the Debtors Account Immediate ACH and Credit card payments are processed on the debtors account. It will form a group of transactions that have been processed in CollectMax and waiting to be Processed, Settled on the PaymentVision website. The reporting piece is based off of the communications between PaymentVision. PaymentVision requires that you go to the actual website to post pending transactions. They will have options on PaymentVision's website that will allow you to automate a few of the settings. Please contact your PaymentVision rep for more information concerning their automated settings.
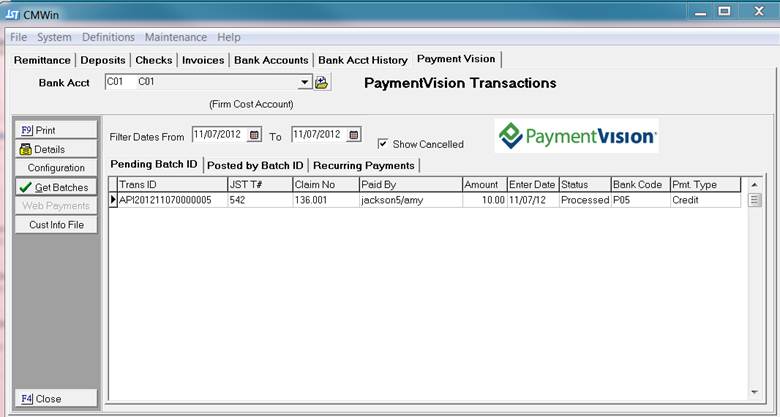
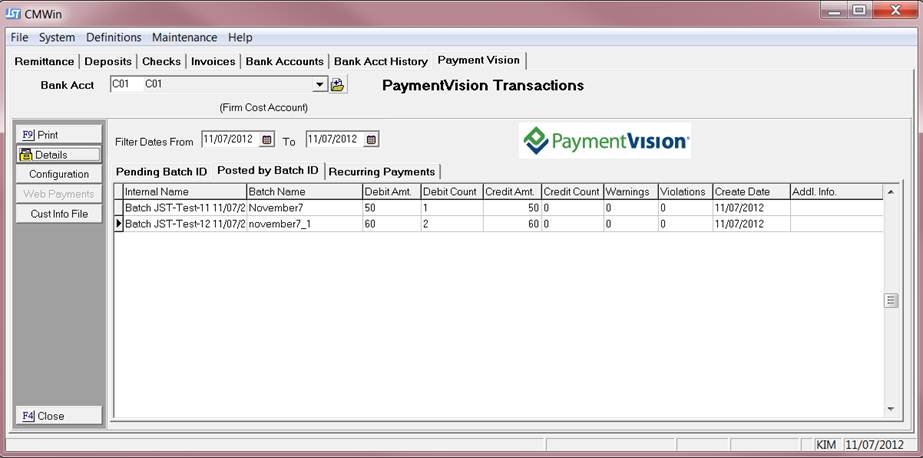
The Pending Batch ID tab stores all the transactions entered under the debtors financial tab. This tab will allow you to check the status of all your transactions.
1. This can be done by going to the Main Menu, Accounting, Payment
Vision, Select the ![]() Tab.
Tab.

2. We allow you to select your filter dates. This allows you to only display the items you are interested in.
![]()
3. We have a show canceled option. This will display all transactions if checked. It means all Deleted or canceled transactions will show as pending.
![]()
4. By clicking on![]() each transaction
will be listed separately on this screen. If you click details on any
transaction, it will display this screen.
each transaction
will be listed separately on this screen. If you click details on any
transaction, it will display this screen.
![]()
JST HINT:To update the status at any time click on the ![]() button at any time.
button at any time.
5.
If you need a report of the items on this screen. Then use
the ![]() button. It will list all items under Pending
Batch ID.
button. It will list all items under Pending
Batch ID.
This screen records all the information pertaining to the account and the current status of the payments at PaymentVision. After transactions have settled on the PaymentVision's website you will need to update the status.
After your batches are posted on the PaymentVision's website. You will then need to update posted batches with CollectMax.
JST HINT: PaymentVision has some automated features that will allow for batches to post automatically at the same time every day. This will eliminate for you manually posting batches everyday.
1. Go to Accounting, then the PaymentVision tab.

2. Go to the ![]() button.
button.
3. Then you should set your filter for your batches. This is important so that it will only pull the data for your most recent batches.
![]()
4. The following screen should pull up . Select the date range that you want to get batches for.
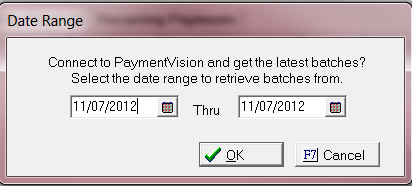
5. Then select![]() .
.
It should produce a PaymentVision Cleared Batch Report. It will list all the items based on your filter range. It will also include the grand totals for the report. This report is used to record all posted transactions.
JST Recommends:To save the report as a pdf or print it out
for your records. This report is not stored anywhere else and it does not have
a reprint feature.
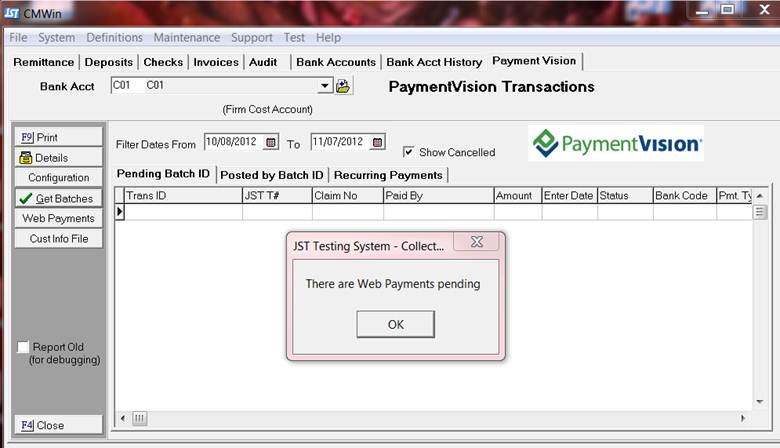
1. This can be done by
going to the Main Menu, Accounting, PaymentVision, Select the ![]() Tab.
Tab.
2. After you post all your pending batches, If you have any Web Payments pending you will see a PaymentVision Transaction ID that starts off with WEB.
![]()
3. After you close the PaymentVision Cleared Batch Report. This pop up should pull up.
4. Then click the ![]() button.
button.
5. This will then activate
your ![]() button.
button.
6. Then you should see two options Process Pending Payments and Clear Payments.

7. Then select "Process Pending Payments".
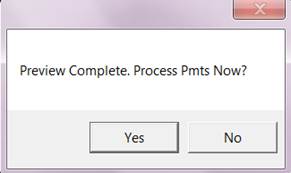
8. Then you should see a pop up for “Prepare for pending Web Payments?”
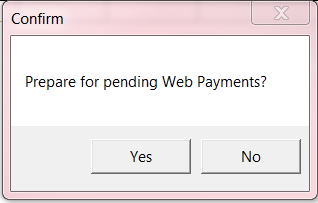
9. Then select ![]() .
.
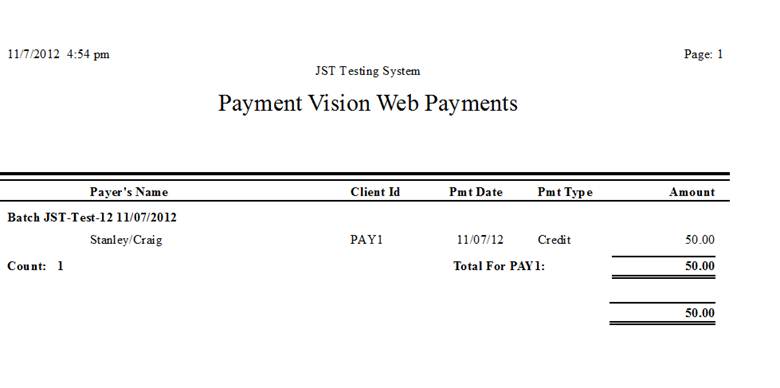
10. Then it will pull up a report called “ PaymentVision Web Payments” it will list the item that it will attempt to post.
JST Recommends:To save the report as a pdf or print it out
for your records. This report is not stored anywhere else and it does not have
a reprint feature.
11. After you close the report this pop up should pull up. This will then try and post all the transactions that it can.
12. Then select ![]() .
.
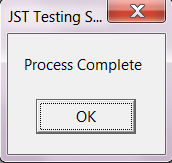
13. If the payments were posted automatically with no error you will see this confirmation box.
14. It should
deactivate the ![]() button.
button.
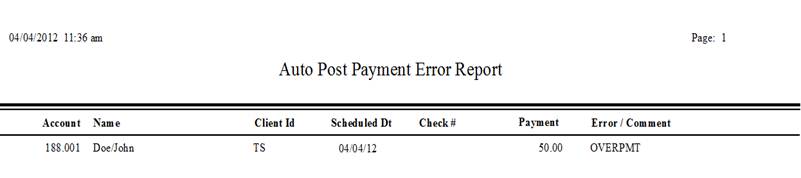
15. If it is unable to post the payments you will receive an Auto Post Payment Error Report. This will list the items that will need to be manually corrected. If you do not get this report, it will post the payments automatically if it can.

16. This pop up will follow after closing the report.
17. Then click ![]() .
.
18. If it requires manual posting . Go to the appropriate account and make whatever corrections are needed.
JST Hints:If the payment results in an
overpayment it will not post. If the account is already an
overpayment. It will not post any new
payments.
19. Once the amount
has corrected and you want to remove the transaction from the Pending Web payments. Select the “Clear Web Payments” option. Select
all the items that you want to clear and the click the ![]() button.
button.
![]()
20. After selecting
Clear it should deactivate the ![]() button.
button.
The recurring payments tab stores all the scheduled payments entered under the scheduled payment screen.
1. This can be done by
going to the Main Menu, Accounting, PaymentVision, Select the ![]() Tab.
Tab.
![]()
2. The filter dates will only show the items within that time frame

3. If you decide to hold any transactions check the box before proceeding.
![]()
4. Then select the ![]() button.
button.
It should produce the following report.
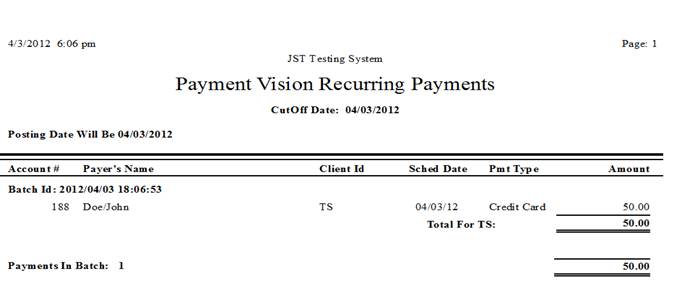
JST Recommends:To save the report as a pdf or print it out
for your records. This report is not stored anywhere else and it does not have
a reprint feature.
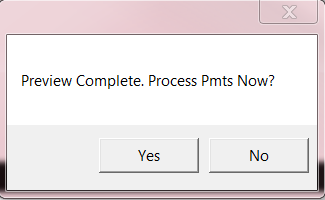
6. After previewing the report, close the report and you should see the following message.
7. Then select ![]() .
.
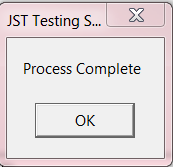
8. If the report process your payments by posting it to the actual debtors account without errors it will not produce any reports. The successful posting of the transaction will produce this message.
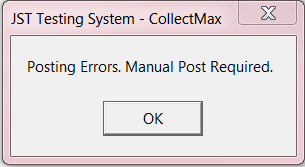
9. If you have a payment that will not post due to a posting error or will require manual posting. It will produce a report. All transactions will be listed with a brief description of the issue.
Each transaction will need to be reviewed manually to make any necessary adjustments to the account as needed.
10. After the payments have processed. If you went to the debtor’s account. It will show that the payment was posted.

If you used the Recurring Payments Settings configuration it may also add status and action codes.
1. This can be done by
going to the Main Menu, Accounting, PaymentVision, Select the ![]() Tab.
Tab.
2. We allow you to select your filter dates. This allows you to only display the items you are interested in.
![]()
3. If you want the
details select a batch by highlighting it and click the ![]() .
.
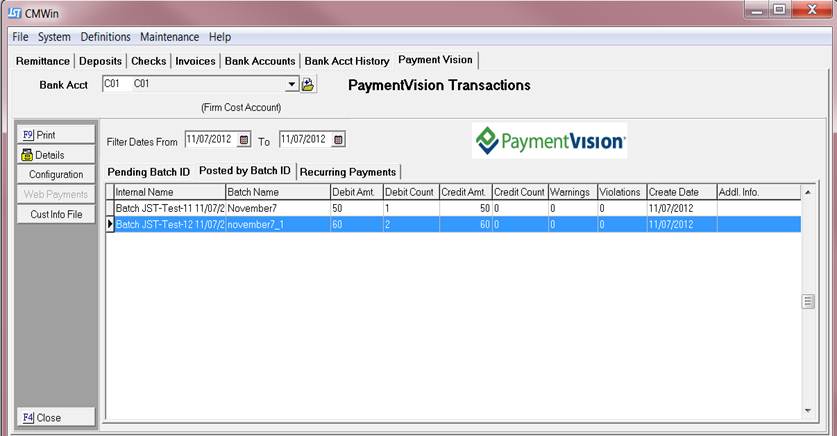
4. When you click the button you will get this box. It will display all transactions that are contained in the posted batch. This report is printable.
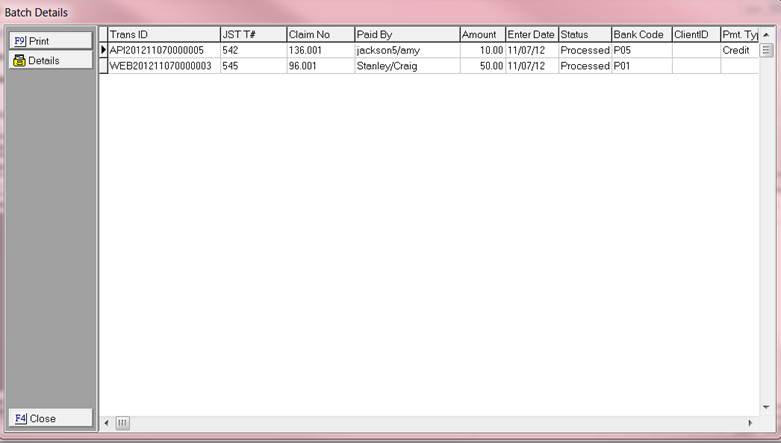
5. If you need more details on a particular transaction highlight the transaction .
6. Then click the ![]() button.
button.
![]()
7. To close select
the F4 button or ![]() button.
button.
Terminology:
Internal Name= CollectMax Batch Identifier
Batch Name= This is the name given on PaymentVision website
for Batch
Debit Amount= The total amount of payments processed.
Debit Count=The total amount of items in batch
Credit Amount=Total amount of Batch
Credit Count=Total number of items in the Batch
Warnings= Total number of Warning
Violations=Total number of Violations
Create Date=The date Batch was created
TransID=PaymentVision ID Number
JST T#=CollectMax Transaction Number
Claim NO=The claim number on account
Paid By=The name of who paid
Amount= The total amount paid
Enter Date=The date transaction entered
Status=The current status on Payment Vision website
Bank Code=CollectMax Bank Code
Client ID= CollectMax Client ID
Pmt Type=The type of payment
Hold=To not process payment until later date
Account #= CollectMax account number
Name= The debtor's name
Schedule Date=The date payment scheduled for.
Amount=The dollar amount of scheduled payment
Pmt Type=The type of payment
Paid By=The name of who paid