 button on the Main Screen.
For this tutorial lesson, we will walk through the steps of the remittance process. See Remittance for Commercial Accounting for accounting option 2.
1.
Click the button on the Main Screen.
2.
Select
the  Tab.
Tab.
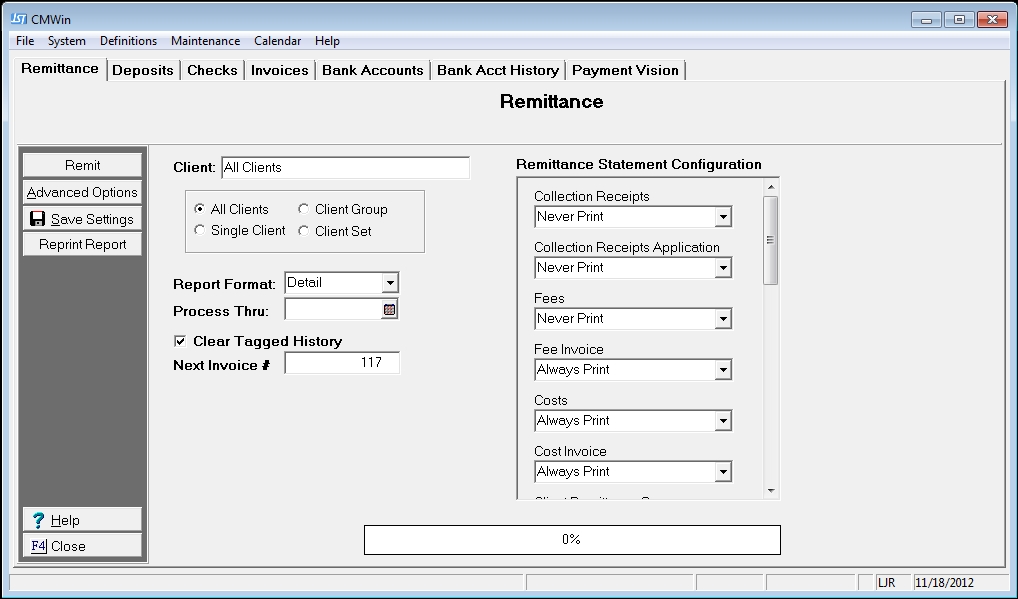
3.
Select
the client(s) to from remittance. Select from all clients, a single client, a client group or a client set.
Click the
![]() button next to the proper selection.
button next to the proper selection.
4. Where appropriate, select a client, group or set.
5. Select the report format of Summary or Detailed. JST recommends the Detailed format that can include a Remittance Statement Report, Remittance Report, Invoice, Cost Detail Report, Remittance Summary Report and Remittance Recap Report for each client. A Summary format will include only the Remittance Summary Report.
Note: If a remittance is finalized in summary format, it will be difficult for Technical Support to reconcile the summary numbers.
For the purpose of the tutorial, please choose the detail option.
![]()
6.
In the
![]() field, enter the cutoff date for remittance processing.
You can enter this by either typing in the date, or by clicking on the
calendar button
field, enter the cutoff date for remittance processing.
You can enter this by either typing in the date, or by clicking on the
calendar button ![]() and choosing the date. Only transactions with dates prior to or equal
to the selected date will be processed.
and choosing the date. Only transactions with dates prior to or equal
to the selected date will be processed.
Note: Payments posted prior to or equal to the selected will only be included if their release dates are prior to or equal to the selected date. Processing remittances into the future is not allowed.
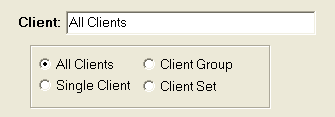
7. Configure the Remittance on the right hand side of the Remittance Screen. See Remittance Statement Configuration for more information
 .
.
For the purposes of this tutorial, leave the default settings.
8.
The ![]() field displays the date of your last completed remittance
for this client. The last date may appear blank if a remittance has never
been performed on this client.
field displays the date of your last completed remittance
for this client. The last date may appear blank if a remittance has never
been performed on this client.
9.
The ![]() check box allows you to clear tagged history notes so that
they will no longer appear on reports which list tagged history notes.
Leave this box checked for this tutorial.
check box allows you to clear tagged history notes so that
they will no longer appear on reports which list tagged history notes.
Leave this box checked for this tutorial.
10.
Enter the next available invoice number. If you would like to assign a
specific invoice number which does not match default invoice number, enter
the specific number in the ![]() field.
field.
11.
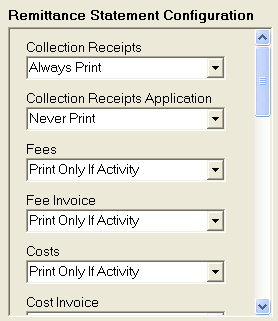
Click on
the ![]() button to display the Remittance Report Options screen.
button to display the Remittance Report Options screen.
12.
Select from the following options of items to include with this remittance: Check the  box next to the appropriate selections.
![]()
![]()


13. Select the sort order you would like to have your accounts print on the Remittance Report. Choose from Claim Number, Debtor Name or Reference Number Sort Orders from the list. For the purpose of the tutorial, select Debtor Name.
![]()
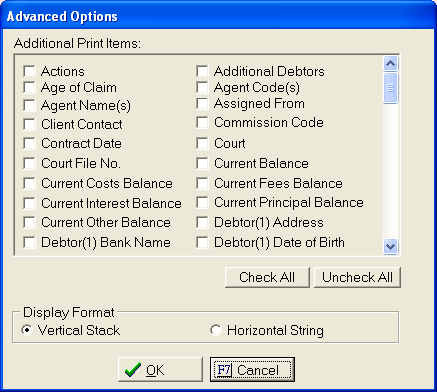
14. The Remittance Report lists the Claim Number, Debtor Name, Reference Account
Number, Total of All payments this remittance and Costs Expended this
remittance period for each claim printed on report. Your
client may want additional information about these account. To
select additional print items, click the ![]() button to display
the Advanced Options Screen. To
include more detailed financial information, scroll to the bottom of the
list and select the appropriate items.
button to display
the Advanced Options Screen. To
include more detailed financial information, scroll to the bottom of the
list and select the appropriate items.
For this tutorial, select a few additional print items.
 .
.
15.
Once
the items have been selected, set the Display Format. Vertical
Stack will list each selected item stacked on top of each other between
each claim on the Remittance Report. Horizontal String will list each
selected item side by side between each claim on the Remittance Report.
Select
your desired format from the Display Format selection ![]() buttons:
buttons:

Select either for this tutorial.
16.
Click ![]() to return to the Remittance Report Options window.
to return to the Remittance Report Options window.
17. To have the additional print items auto-size in Excel, check this box. If not checked the Excel Remit will do the standard sized column widths and all data may not be seen.

18. You may print a footer note (i.e. Thank You for Your Business) at the end of your Remittance Report. Enter any footer message you would like to appear at the bottom of the Remittance Report in the Report Footer Note field.

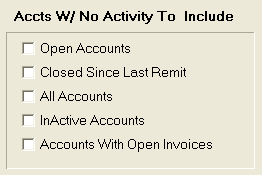
19. You have the option of including accounts with no activity on the Remittance Report. Check the appropriate check boxes to choose what type of accounts without activity you would like to include. For the tutorial purposes do not check any boxes.
20.
Click ![]() to save your Remittance Report Options and return
to the Remittance Tab.
to save your Remittance Report Options and return
to the Remittance Tab.
21.
If you
have selected any specific settings for
this client and would like to save them for future Remittance Processing
for this client, all clients, client
group, or client set, then click the ![]() button.
button.
Hint: Save Settings will work for All Clients, A Client Group, a single Client or a Client Set. If you set particular settings for a single client but do the remit for All Clients the save settings will not be respected for the single client.
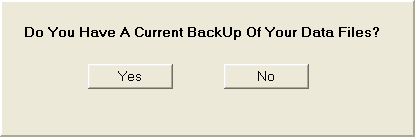
22.
You are
now ready to remit. Click the ![]() button. This will open a
question window where you need to verify you have a current backup of
your data:
button. This will open a
question window where you need to verify you have a current backup of
your data:
 .
.
Note: At this point you need to verify that a backup of your data files is being done regularly. If you finalize a remittance or an error occurs during the remittance process, the backup could be your only means of reverting back to prior to the remittance. Finalize a Remittance is a non-reversible process. Once a final is done, JST cannot get you back to your prior numbers.
23.
Verify that you have a current backup of your data and click ![]()
24. Select a printer option:
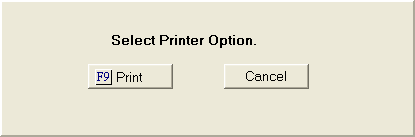 .
.
25.
Click the ![]() button. This will open the print to box, where
you need to select where you would like your reports to print to.
button. This will open the print to box, where
you need to select where you would like your reports to print to.

26. Select To Screen.
Hint: Printing to screen and selecting to print from there is the recommended process and is often a faster option than printing directly to printer.
27. Review your printed items: Remittance Statement, Remittance Report, Remittance Invoice(s), Cost Detail Report, Cost Analysis Report, Remittance Recap Report and Remittance Summary Report. If correct, print the report and exit.
Hint: If the reports are correct, you should print the report because the final remittance process does not produce a report.
28. Once exiting the remittance reports, a spreadsheet preview box will be displayed.
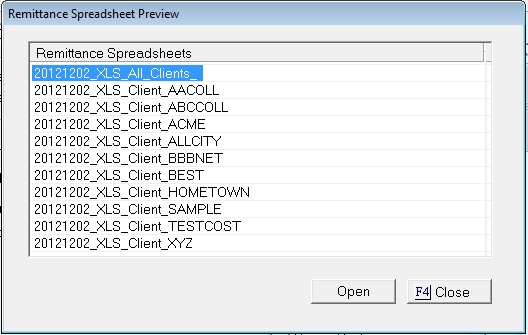
Select the spreadsheet you would like to review, click the  button. Excel will launched the report for review.
If your printed reports and spreadsheets properly reflect your remittance figures, you
are ready to finalize your remittance. CollectMax will prompt you to create
your final remittance transactions at this time. Select ![]() from the Create Final Remittance Transactions Now window.
from the Create Final Remittance Transactions Now window.
Hint: The preview statement will include an invoice. You must finalize the remittance before your invoice will be added to client's account to be paid. It is possible to print an Invoice during the preview process that never gets finalized so is unavailable for payment.
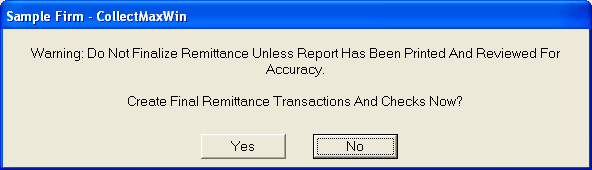
Note: If your reports do not properly reflect your intended remittance figures, you may select No and make any adjustments to correct them. After making the adjustments, you may reprocess your remittance. The remittance process does not create a final report. If you choose to finalize without printing the reports, you may have to restore from backup to reprint a report unless you have Version 4 or above of CollectMax. If so, see Reprint Remittance Reports.
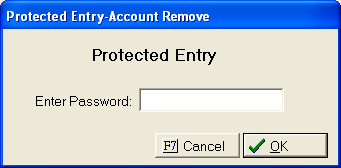
29.
If the process has the correct remittance figures, click ![]() . The final remittance process is password protected. Enter
your CollectMax master password in the Password Protected window:
. The final remittance process is password protected. Enter
your CollectMax master password in the Password Protected window:
 .
.
30. A message will pop-up to let you know your remittance process has been finalized and is complete.