This feature allows users to check spelling while typing debtor and client history notes. This feature works very similar to the Microsoft Word Spell Check feature.
To Turn on History Spell Checking
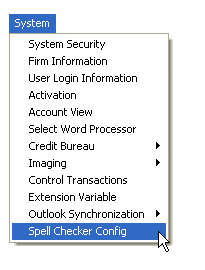
On the menu bar of CollectMax, click System, Spell Checker Config
to display the Spelling Options Screen.
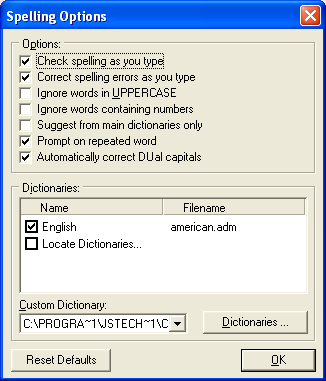
Select from the following:
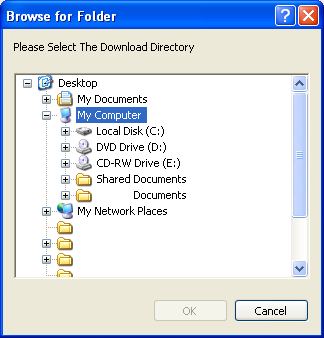
Select the Dictionary to use. The Default is to use the American Dictionary. To use another uncheck English and check Locate Dictionaries. A browse window will be displayed. Browse to find the dictionary to be used for spell checking.
Select the Custom Dictionary to use. Each user will have their own custom dictionary that includes words added to the dictionary.
![]()
Or users
can share a custom dictionary by clicking the  button and
selecting CUSTOM or AutoCorrect.
button and
selecting CUSTOM or AutoCorrect.
Note:
This feature
can be used as a replacement for or complementary to the note codes. With
the replace as you type feature users can type a code and have it replace
with a complete sentence. Care
should be taken that the code does not corresponded to a commonly used
word or this word will be replaced each time.
To reset
the options to the defaults, click the ![]() button.
button.
Click the
 button to save the settings.
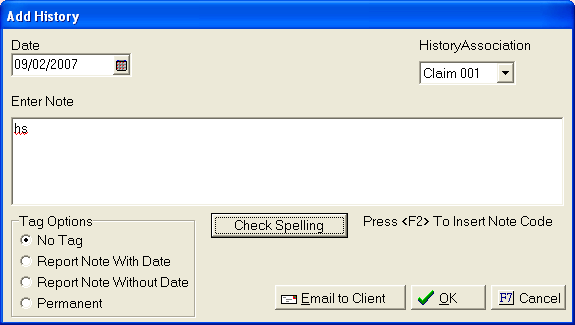
When adding
a debtor history note on the History Tab of a Debtor's Account, click
the ![]() to display the Add History Note Screen.
to display the Add History Note Screen.
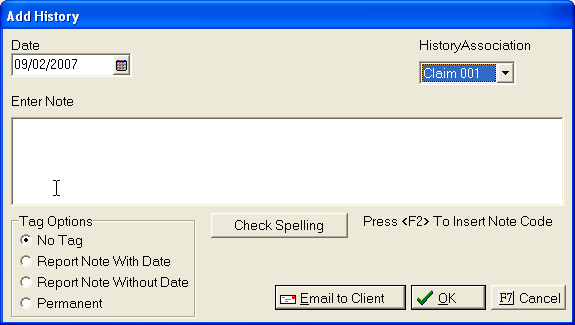
If selected the auto correct will fix any misspelled words using the selected dictionary. If the auto correct can't determine the proper word, it will leave a red wavy line under the questionable word.
If the word
is indeed misspelled, Click the ![]() button. The
suggested spelling screen will appear.
button. The
suggested spelling screen will appear.
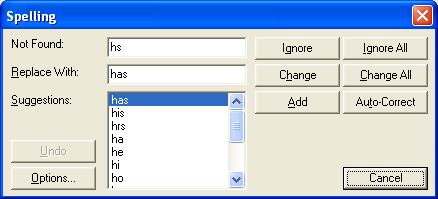
Users can choose to change the word to the highlighted suggested word, ignore the misspelling, auto-correct the misspelling, or add the misspelled word to the dictionary. If added to the dictionary, the next time this work will not be considered misspelled.
User can also access the spelling checker options by clicking the option button.