Debtor Balance Report Selection Criteria
Use the following selection
criteria to narrow down the accounts to be included on this report. Otherwise,
the report will list all debtor accounts for all clients.
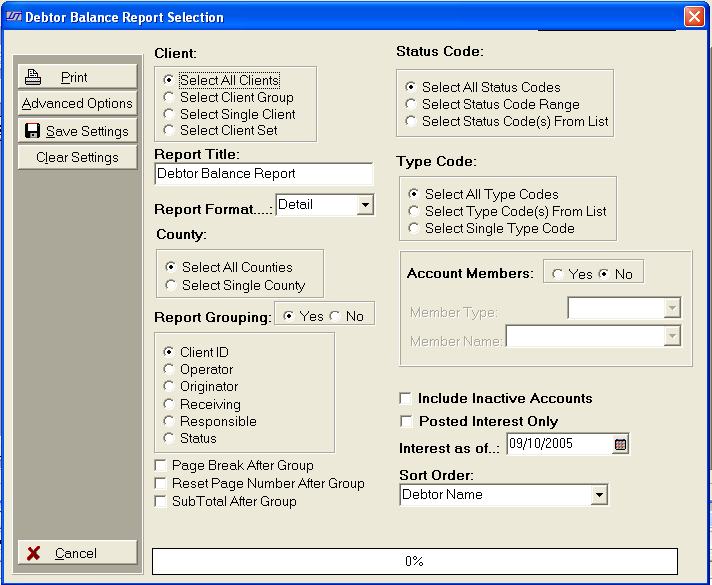
- Client: Select to include All Clients, a Client
Group, a Single Client or a Client Set. Only accounts with this client
selection will be eligible for inclusion on this report.
- Status Codes: Select to include accounts
with All Status Codes, a Status Code Range or Status Code(s)
From List only accounts with the selected status codes will eligible
for inclusion on this report.
- Report title: The Report Title will
default to Debtor Balance Report. To
change the report title, click in text box and enter new name.
- Report Format: Click the
 button
and select the Report Format. Choose
either Summary or Detailed.
button
and select the Report Format. Choose
either Summary or Detailed.
- Type Code: Click
to include either All Type Codes, Type Code(s)
from List or a Single Type Code. Only accounts with the selected type
codes will be eligible for inclusion on this report.
- County: Select to include accounts from
All debtor Counties or a single County. See
County. Only
accounts with the selected counties will be eligible for inclusion on
this report.
- Account Members: To narrow the report
to include only accounts with a selected account member, select Yes next
to the Account Member selection.
- Report Grouping: Click Yes
or No for Report Grouping.
- Page Break: Check Page Break After Group to start each Group listing
on a new page. If left blank, the next Group in the report will start
after the previous Group with no page break.
- Page Number: Check Reset Page Number After Group to cause the page
counter to be reset to page #1 after each group. If left blank the report
will page sequentially until complete.
- Sub Total: Select Sub Total After Group to display a Subtotal line to be printed at the end of each group listing. When
left blank no Subtotal line is generated.
- Inactive
Accounts: Click
the
 box to include Inactive
Accounts. Otherwise,
only active accounts will be eligible for inclusion on this report.
box to include Inactive
Accounts. Otherwise,
only active accounts will be eligible for inclusion on this report.
- Post Interest: If you want the report
to print the only the interest that has been posted with an INT
transaction then check the Posted Interest Only box. This
will not include the new interest on the account.
- Sort Order:
Click the button to select the report Sort Order. Select
to order the report by Debtor
Name, Claim Number, Reference Account Number or Court File Number.
- Interest As Of: Click the
 button and select the Interest As Of date to show all interest
including new interest through the selected date.
button and select the Interest As Of date to show all interest
including new interest through the selected date.
- Advanced Options: To include additional
fields of information on a report, click Advanced Optionslocated on the
left side of the Report Selection Screen.
- Save Settings: To save these report
settings, click the
 button. Users
do not have to save settings to run the report with the current selections.
The
save settings option can be used as a short cut when running future reports.
Select
the most common settings and click the button. The
next time this report accessed it will show the settings that were saved.
To
clear the saved settings, click the
button. Users
do not have to save settings to run the report with the current selections.
The
save settings option can be used as a short cut when running future reports.
Select
the most common settings and click the button. The
next time this report accessed it will show the settings that were saved.
To
clear the saved settings, click the  button.
- Print: To generate report click Print. Then select to print to
File, Printer, Screen or Cancel generation
of report.
- Debtor Balance Detail Report Samples
- Debtor Balance Summary Report Samples